
Adding a SaaS applicationBeta
The Marketplace service and the SaaS application interact with each other via a SaaS broker using the VK OSB protocol. The protocol is provided by the VK Cloud platform.
Requirements for the SaaS broker:
-
The broker must implement methods that describe the lifecycle of service instances. The methods are shown in the diagram.
Broker interaction scheme with the marketplace and the SaaS application -
The broker must have authentication configured over the secure HTTPS protocol with a certificate issued by a trusted certificate authority.
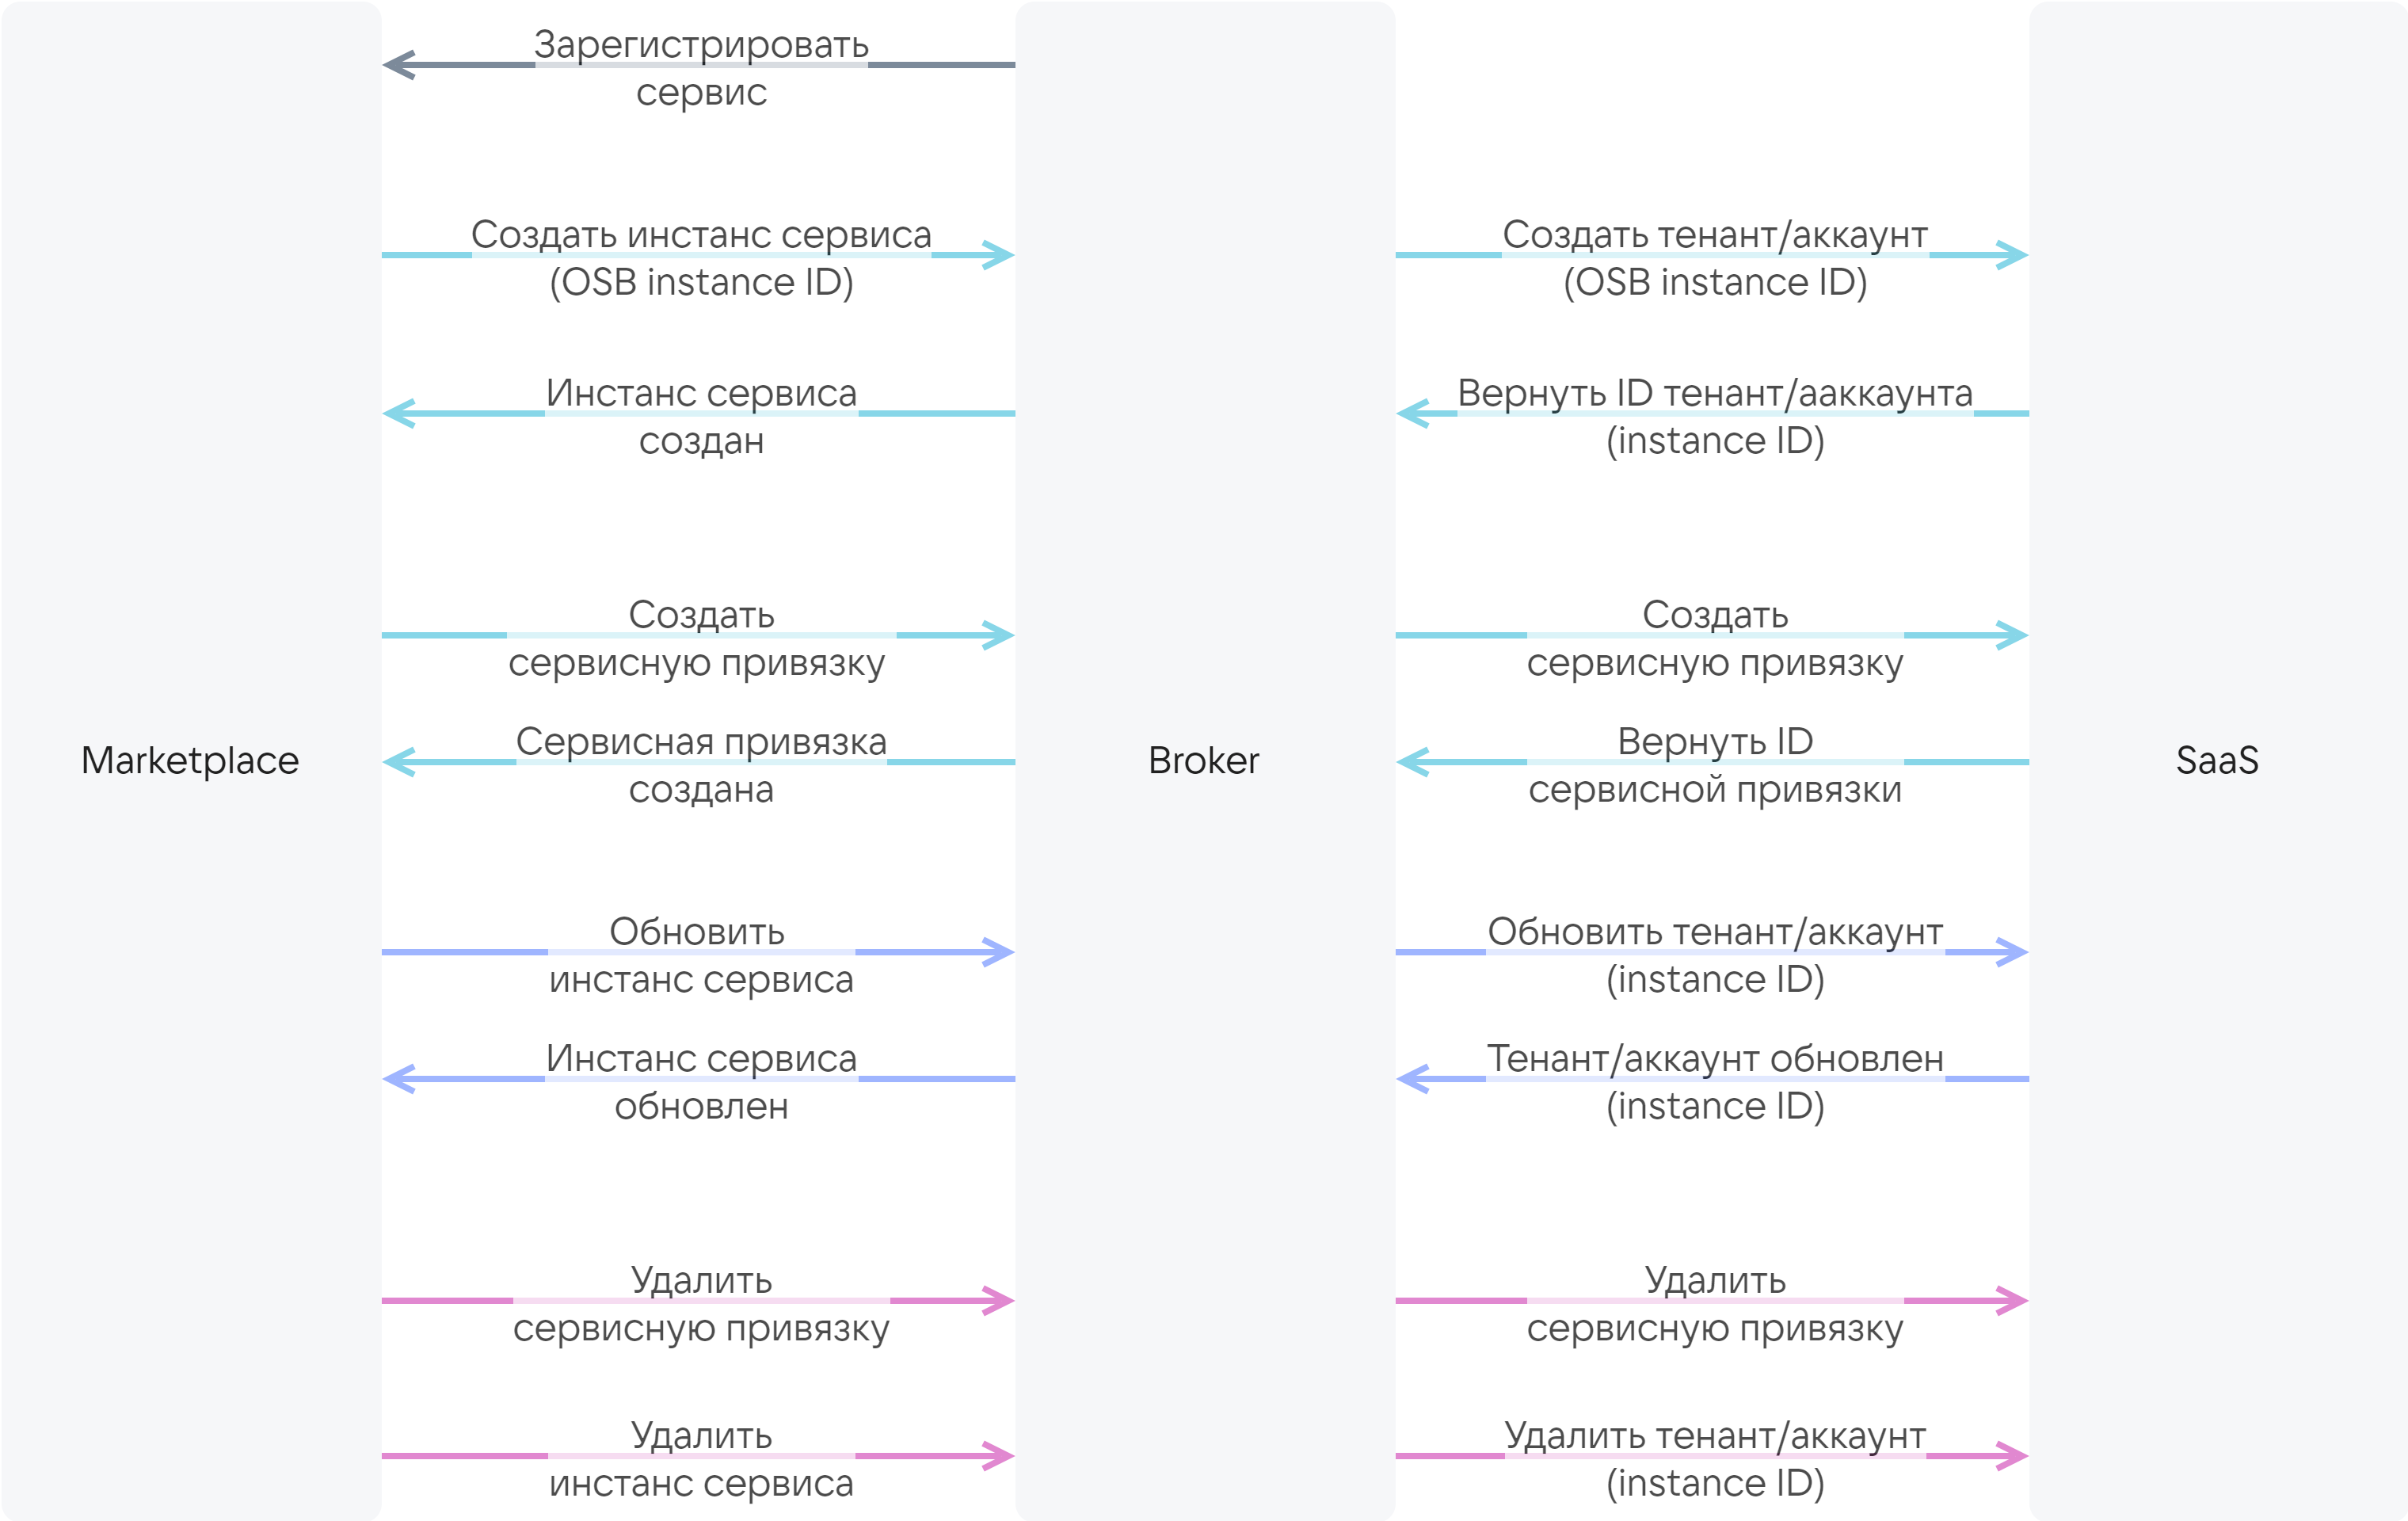
The SaaS application provider develops the SaaS broker entirely on their own or based on a template provided by the VK Cloud platform. The template already implements the interaction between the marketplace and the broker. It needs to be supplemented with a description of the broker's interaction with a specific SaaS application. The template is written in Python based on the FastAPI framework.
These instructions are intended for the case of developing a SaaS broker based on the template from VK Cloud.
-
Send an email to marketplace@cloud.vk.com. In the email, request:
- the VK OSB protocol;
- the template for developing a SaaS broker;
- the names of the test and public Marketplace namespaces and access to them.
-
Send an email to marketplace@cloud.vk.com with an icon attached in SVG format at least 62 × 62 pixels in size. The size of the icon file must not exceed 1 MB.
The service icon is displayed in the service card:
- In the marketplace catalog.
- On the Service description tab on the service page.
A reply email will be sent containing the icon URL, which is specified in the service configuration JSON file.
-
Register with VK Cloud. A VK Cloud account is required to test the application in the marketplace.
-
Create a
catalog_<SERVICE_NAME>.jsonfile. -
In the JSON file, describe the service configuration using the following structure:
{"services": [{<SERVICE_PARAMETERS>,"preview": {"parameters": [{"name": "<OPTION_NAME_1>" // Name of the first pricing option},{"name": "<OPTION_NAME_2>" // Name of the second pricing option},...]},"plans": [{ // Description of the first pricing plan<PLAN_PARAMETERS>,"display": {},"billing": {},"schemas": {}},{ // Description of the second pricing plan<PLAN_PARAMETERS>,"display": {},"billing": {},"schemas": {}},...]}]}Here:
-
<SERVICE_PARAMETERS>— service parameters. -
The
previewandplanssections together define the appearance of the pricing plan matrix. The matrix will display all pricing plans specified in theplanssection and the pricing options specified in thepreviewsection. -
The
parametersarray of thepreviewsection contains the names of pricing options and can be empty. These names are used only in the configuration JSON file. In the marketplace interface, pricing options will be displayed with the names specified in the schemas section by thedescriptionparameter of these options. -
The
planssection describes pricing plans and their options, and for each plan contains the following blocks:<PLAN_PARAMETERS>— plan parameters.- The display section describes the pricing plan configuration wizard.
- The billing section contains information about the cost and billing method of the plan and its options.
- The schemas section lists the pricing options of the plan.
-
-
Develop a client for interacting with the API of your service.
-
Develop a service manager that describes the interaction between the broker and the service. To do this, implement the following methods:
Method
Input data
Creating a tenant or account
- The OSB ID of the service instance, which is generated by the marketplace when the service is connected. The OSB ID is passed to the SaaS application so that the SaaS application generates the service instance ID. The service instance ID is used in the methods described below in the table.
- The tariff plan ID.
- The tariff plan options described in the service configuration JSON file in the plans.schemas.service_instance.create section.
- (Optional) Context containing user information: email, unique project identifier (PID)
Updating a tenant or account
- The service instance ID.
- The tariff plan ID.
- The tariff plan options described in the service configuration JSON file in the plans.schemas.service_instance.update section
Retrieving and deleting a tenant or account
The service instance ID
Creating service bindings
- The service instance ID.
- The service binding parameters described in the service configuration JSON file in the plans.schemas.service_binding.create section.
- (Optional) Context containing user information: email, unique project identifier (PID)
Retrieving and deleting service bindings
- The service instance ID.
- The service binding ID
-
Integrate the client into the service manager.
-
Configure authentication in the broker.
-
If the SaaS application has postpaid tariff options and metrics for them are collected using the pull model, perform additional steps:
-
In the service manager, implement a method for obtaining a report on the actually consumed resources of the SaaS application. In response to the request, the broker must send the report to the marketplace.
-
In the service manager, implement a method for notifying the broker that the report has been processed (funds have been charged according to the report or the charge has been scheduled).
-
-
Navigate to the broker directory.
-
Place the service configuration file
catalog_<SERVICE_NAME>.jsonin theresourcessubdirectory. -
In the
resources/plan_mapping.jsonfile, specify:-
<SERVICE_NAME>— the service name. -
<PLAN_ID>— the IDs of the tariff plans specified in thecatalog_<SERVICE_NAME>.jsonfile. -
<SAAS_PLAN_ID>(format:string) — the tariff plan IDs on the service side corresponding to the<PLAN_ID>tariff plan IDs.{"<SERVICE_NAME>": {"<PLAN_ID>": <SAAS_PLAN_ID>,"<PLAN_ID>": <SAAS_PLAN_ID>}}
Example of the
plan_mapping.jsonfile contents:{"VKT": {"0dc54b75-XXXX-89d5a47eef71": 1,"312b628e-XXXX-080ab4ca3acb": 2,"e2ae1588-XXXX-3f5081a799a9": 3,"b54e7247-XXXX-7a9dccc22e7b": 4}} -
-
In the broker directory, rename the
.env.examplefile to.env. -
In the
.envfile, specify the service name inBROKER_MODE:BROKER_MODE=<SERVICE_NAME>
-
In the
.envfile in the broker directory, describe the environment variables:BROKER_PROVIDER_CLIENT_ID— the broker name for accessing the SaaS application.BROKER_PROVIDER_SECRET— the password for the broker to access the SaaS application.BROKER_PROVIDER_URL— the URL of the SaaS application.BROKER_USERNAME— the marketplace name for interservice interaction with the broker.BROKER_PASSWORD— the marketplace password for interservice interaction with the broker.
-
In the
.envfile in the broker directory, specify the variable values for accessing the broker database. -
Install the Python libraries by running the command:
Linuxpip install -r requirements/prod.txt -
Start the broker by running the command:
Linuxgunicorn app.main:app --log-file - --workers ${UVICORN_WORKERS:-1} --worker-class uvicorn.workers.UvicornWorker --bind 0.0.0.0:${BROKER_PORT:-8000} --timeout ${WORKER_TIMEOUT:-90}Example of the response to the broker start command:
INFO: Started server process [34934]INFO: Waiting for application startup.INFO: Application startup complete.INFO: Uvicorn running on http://0.0.0.0:8000 (Press CTRL+C to quit) -
After installing the broker, open the http://0.0.0.0:8000/docs page in your browser.
The page contains the broker API description in the Swagger editor.
-
Make API requests using the following parameters:
- The value of the VK OSB protocol version
x-broker-api-version(for example,"0.1"). - The
BROKER_USERNAMEvalue from the.envfile. - The
BROKER_PASSWORDvalue from the.envfile.
- The value of the VK OSB protocol version
To build the image, use the Dockerfile file in the broker template directory.
Send an email to marketplace@cloud.vk.com. In the email, specify:
-
Company information:
- the company name,
- the contact person,
- the phone number.
-
The email address of the user who will receive notifications about errors when creating service instances.
-
The broker parameters listed in the table.
Name | Description | Format | Required |
|---|---|---|---|
| The broker name | string |
|
| The URL to which requests from the marketplace will be sent | string |
|
| The broker description | string |
|
| The VK OSB protocol version | string |
|
| The marketplace name for interservice interaction with the broker. | string |
|
| The marketplace password for interservice interaction with the broker. | string |
|


After the broker is registered, the SaaS application will become available in the test namespace of the marketplace. The service will be available in the public namespace of the marketplace only after publication.
To check how the service will function in VK Cloud, test it in the test namespace of the marketplace:
-
Send an email to marketplace@cloud.vk.com to receive a grant for testing the service. The funds will be credited to the bonus account of your project in VK Cloud.
-
If you do not have access to the test namespaces specified in the service configuration, send an email to marketplace@cloud.vk.com. In the email, specify:
- The names of the test Marketplace namespaces specified in the
metadataparameter of the service configuration JSON file. - The email address of the user who needs access to the test Marketplace namespaces.
- The names of the test Marketplace namespaces specified in the
-
Go to the Marketplace section of the VK Cloud management console.
-
Click the All solutions button.
-
Click your service's card and go to the Pricing plans tab.
-
Make sure the configuration wizard for each pricing plan is displayed correctly.
-
Connect the service.
-
Update the service instance:
- Change the values of the pricing options of the current pricing plan.
- Switch to a new pricing plan.
-
Test the main user scenarios of the service.
-
Delete the service instance.
-
If necessary, make changes to the service configuration:
- Navigate to the
resourcessubdirectory of the broker directory. - Edit the
catalog_<SERVICE_NAME>.jsonandplan_mapping.jsonfiles. - Repeat the testing one more time.
- Navigate to the
-
If you specified test cost values in the service configuration for the duration of testing and debugging, edit the
catalog_<SERVICE_NAME>.jsonfile specifying the real values in it.
Send an email to marketplace@cloud.vk.com. In the email, specify the service ID and its revision.
The service configuration will be moderated. After that, the service will be published in the marketplace.
The published revision of the service will move from the test namespace of the marketplace to the public namespace specified in the metadata parameter of the service configuration JSON file. The service will be available to all users who have access to this public namespace.