
Setting up a VPN tunnel using SDN Neutron
VK Cloud allows you to establish network connectivity between on-premises infrastructure and a VK Cloud virtual network with SDN Neutron using a VPN tunnel.
As an example, a VPN tunnel will be built based on a standard router to another network in VK Cloud. A virtual machine will be used as the VPN endpoint. The instructions for setting up the VPN tunnel can be adapted to work with any other VPN endpoint, such as a corporate firewall or other network equipment.
The VPN tunnel in the example will connect the following networks:
- Client network — a network in VK Cloud that simulates a network in on-premises infrastructure.
- Virtual network — a network in VK Cloud connected to a standard router.
Virtual machines will be created in each network to verify the tunnel's operability.
-
Make sure that the OpenStack CLI is installed, and authenticate in the project.
-
Create the networks.
Client networkVirtual networkThis network will act as the client network.
When creating the network, set the following parameters:
-
Network name:
clientNet. -
SDN:
Neutron. SDN Sprut is created by default. -
Internet access: make sure this option is selected. It will allow assigning public Floating IP addresses to virtual machines in this network.
-
Router:
Create new. -
List of subnets: edit the only subnet in the list. Set the following parameters for the subnet:
- Name:
clientSubnet. - Address:
172.16.0.0/29. - Gateway:
172.16.0.1. - Enable DHCP: make sure this option is selected.
- DHCP IP address pool:
172.16.0.2 - 172.16.0.6. - Private DNS: make sure this option is selected.
- Name:
-
-
Determine which routers were created for these networks. This information will be needed for further VPN configuration.
It is further assumed that:
- the router
router_1234was created for theclientNetnetwork; - the router
router_5678was created for thevkcloudNetnetwork.
- the router
-
Determine the IP address of the
SNATinterface for therouter_5678router:-
Open the page with the list of subnets for the
vkcloudNetnetwork. -
Click the name of the
vkcloudSubnetsubnet. -
Go to the Ports tab.
-
Find the
SNATdevice port in the list of ports and copy its IP address.
-
-
Create a virtual machine that will act as the VPN gateway in the
clientNetclient network, with the following parameters:- Virtual machine name:
client_vpn_gw. - Virtual machine type:
STD3-2-4. - Number of machines in the configuration: one.
- Operating system:
Ubuntu 22.04. - Network: the client network and the corresponding subnet
clientNet: clientSubnet. - Virtual machine key: the key that will be used for the SSH connection.
- Firewall settings: everything is allowed (
all). - Assign external IP: make sure this option is selected.
Choose the other virtual machine parameters at your discretion.
- Virtual machine name:
-
Collect the information needed for further work. It is further assumed that:
Object | Value |
|---|---|
Public IP address of the |
|
IP address of the |
|
Floating IP address of the |
|
Client subnet on the side of the client VPN gateway |
|
Virtual subnet on the side of the cloud VPN gateway |
|
IP address of the |
|
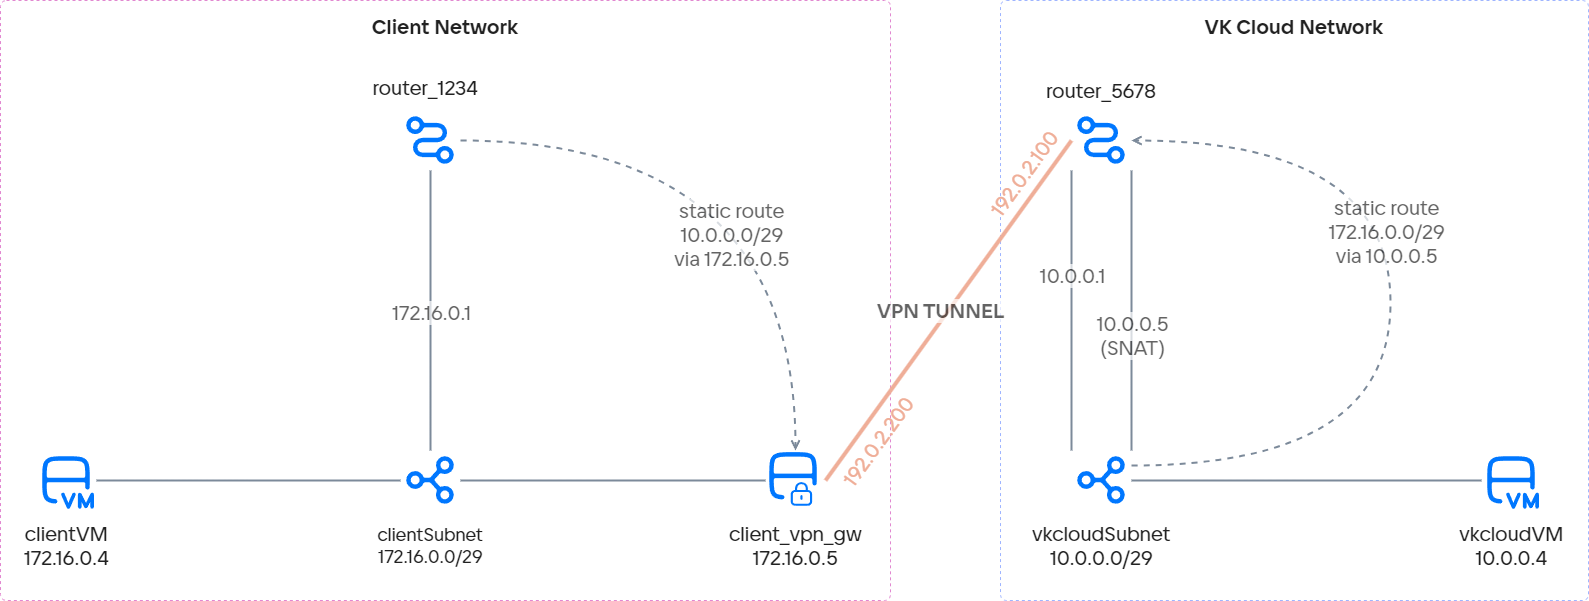
Create a VPN tunnel with the following parameters:
Select IKE policy — New IKE policy, and set:
- Policy name:
vkcloud-client-ike. - Key lifetime: 3600 seconds.
- Authorization algorithm:
sha256. - Encryption algorithm:
aes-256. - IKE version:
v2. - Diffie-Hellman group:
group14.
-
Disable IP Source Guard for the VPN gateway port so that it can forward any traffic:
-
Find the port with the private IP address
172.16.0.5of theclient_vpn_gwvirtual machine. Get the ID of this port. -
Allow traffic from any addresses through this port:
openstack port set <PORT_ID> --allowed-address ip-address=0.0.0.0/0
-
-
Connect to the
client_vpn_gwvirtual machine via SSH. All further actions must be performed on this virtual machine. -
Enable IP Forwarding so that the virtual machine can route traffic from the private network to the VPN tunnel:
echo 'net.ipv4.ip_forward = 1' | sudo tee -a /etc/sysctl.confsudo sysctl -p -
Install StrongSwan — an IPsec VPN implementation for Linux:
sudo apt updatesudo apt install -y strongswan libcharon-extra-plugins libcharon-extauth-plugins libstrongswan-extra-plugins -
Add the VPN connection parameters on the client network side to the
/etc/ipsec.conffile. These parameters are a mirror reflection of the tunnel settings made on the cloud network side.conn client-vkcloud-vpnauthby=secretleft=%defaultrouteleftid=192.0.2.200leftsubnet=172.16.0.0/29right=192.0.2.100rightsubnet=10.0.0.0/29ike=aes256-sha2_256-modp2048!esp=aes256-sha2_256!keyingtries=0ikelifetime=3600lifetime=8hdpddelay=30dpdtimeout=120dpdaction=holdauto=start -
Specify the pre-shared key (PSK) in the
/etc/ipsec.secretsfile. The key must match the key specified on the cloud network side:192.0.2.200 192.0.2.100 : PSK "<PREDEFINED_PRE-SHARED_KEY>" -
Restart the StrongSwan service:
sudo systemctl restart strongswan-starter
For traffic to pass through the VPN tunnel, you need to add static routes:
-
In your management console, open the page with the list of subnets for the
vkcloudNetnetwork. -
Click
 for the
vkcloudSubnetsubnet and selectEdit subnet. -
Make sure the Show static routes field option is selected.
-
In the field, enter a static route to the client network
172.16.0.0/29. As the next hop, you need to specify the IP address of theSNATinterface of therouter_5678router in thevkcloudSubnetcloud subnet.172.16.0.0/29 - 10.0.0.5
-
Check the status of the VPN tunnel on the VK Cloud platform side.
To do this, open the
vkcloud-client-vpnVPN page in your management console and go to the Tunnel settings tab. The VPN should be in theACTIVEstatus. -
Create a
icmpsecurity group that allows ICMP traffic.In this group, create an inbound rule:
- Type:
ICMP. - Remote address:
All IP addresses.
This is needed so that the test virtual machines can ping each other.
- Type:
-
Create two virtual machines:
-
clientVM:- in the
clientNetnetwork,clientSubnetsubnet; - with a Floating IP address for connecting to it via SSH;
- with the
default,ssh,icmpsecurity groups.
- in the
-
vkcloudVM:- in the
vkcloudNetnetwork,vkcloudSubnetsubnet; - with a Floating IP address for connecting to it via SSH;
- with the
default,ssh,icmpsecurity groups.
- in the
-
-
Determine the private IP addresses of the virtual machines in the corresponding subnets. Let:
clientVMhave the IP address172.16.0.4;vkcloudVMhave the IP address10.0.0.4.
-
Connect to the
vkcloudVMvirtual machine via SSH. -
Ping the
clientVMvirtual machine from thevkcloudVMvirtual machine:ping 172.16.0.4The
clientVMhost should respond to the ping.
If you no longer need the created resources, delete them: