
Setting up a VPN tunnel using SDN Sprut
Using the advanced router, you can set up a VPN tunnel between your on-premises infrastructure network and the virtual networks of VK Cloud.
To demonstrate the advanced router configuration, two independent networks will be connected:
- Client network — the customer's internal network.
- Virtual network — located in VK Cloud and connected to the platform router.
To demonstrate the connection setup, the following will be created in the VK Cloud management console:
- the
vRouter01advanced router; - a router interface for internet access with the address
212.233.88.21; - the
priv_net_demoprivate network; - the
priv_subnet_demoprivate subnet with the address10.10.2.0/24; - a VM:
test-vmwith the address10.10.2.213; - the
permit-remote-cidr-insecurity group.
The client network will use:
- a MikroTik router running RouterOS 7.19.3;
- a server with Debian 12 OS;
- IKEv2 for IPsec configuration;
- a pre-shared key (PSK) for negotiating the IKE phase.
The network topology is as follows:
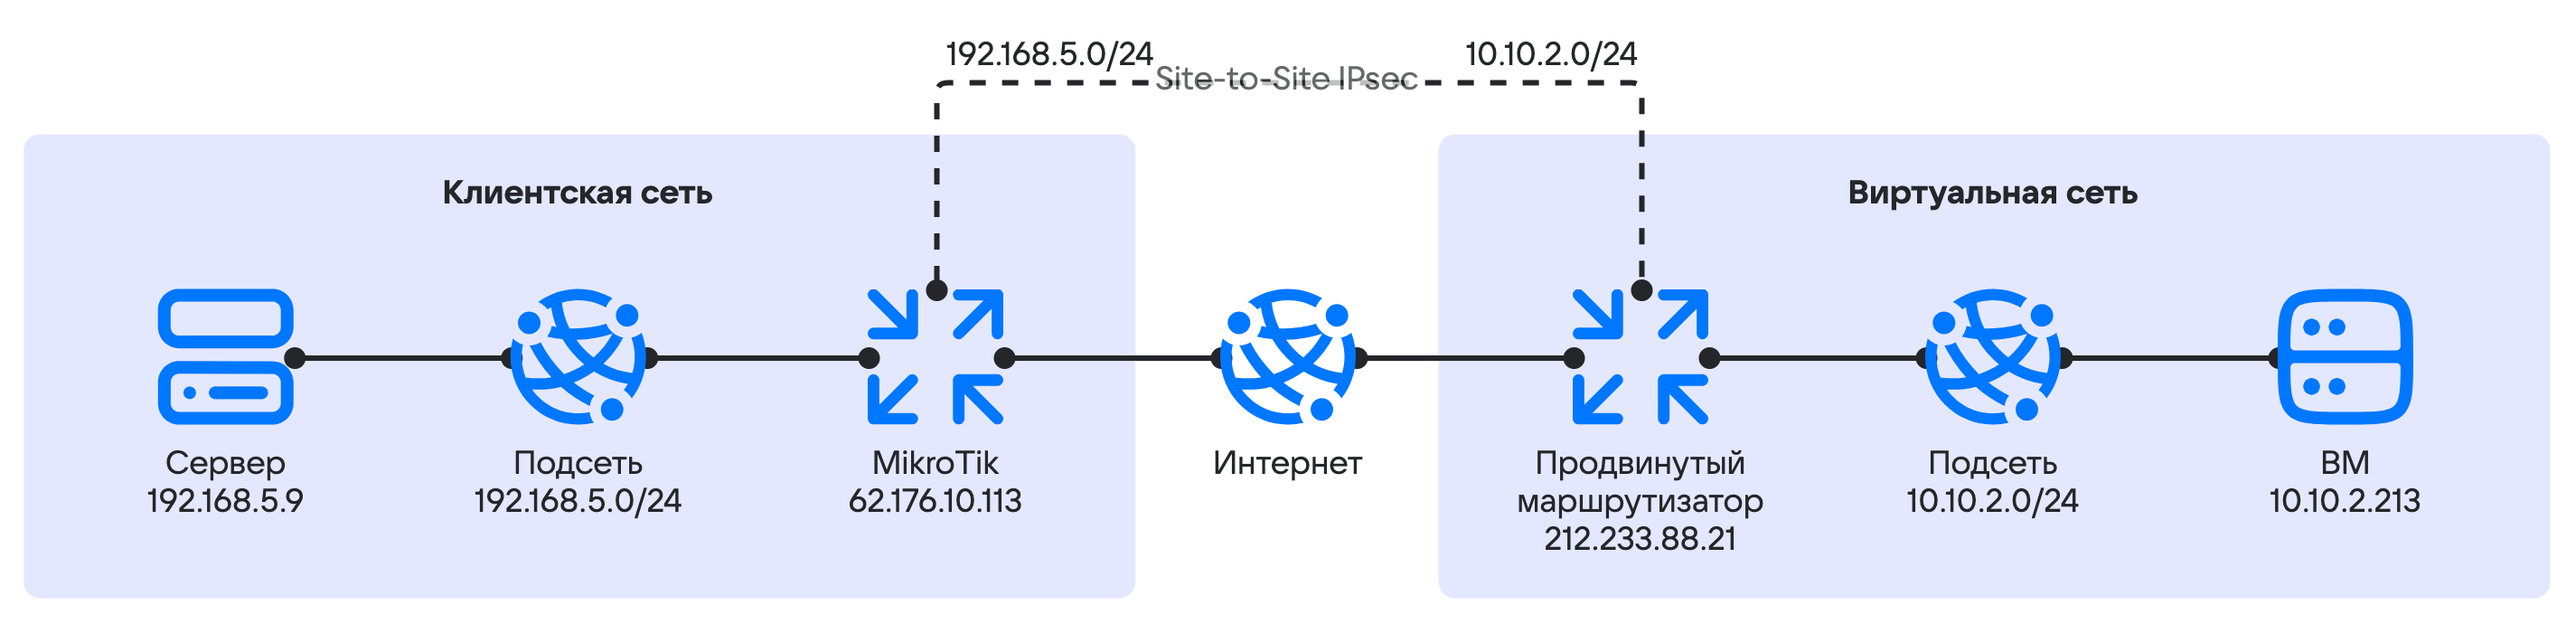
-
Make sure the OpenStack CLI is installed, and authenticate in the project.
-
Go to the VK Cloud management console.
-
Select the project.
-
Create a network with the following parameters:
-
Network name:
priv_net_demo. -
SDN:
Sprut. -
Private DNS zone:
mcs.local. -
Router:
Do not use. -
List of subnets: edit the only subnet in the list. Set the following parameters for the subnet:
- Name:
priv_subnet_demo. - Address:
10.10.2.0/24. - Gateway:
10.10.2.1. - Enable DHCP: make sure this option is selected.
- DHCP IP address pool:
10.10.2.100 - 10.10.2.200. - Private DNS: make sure this option is selected.
- Name:
-
-
Create an advanced router with the following parameters:
- Router type:
Advanced. - Name:
vRouter01. - Availability zone:
Москва ME1. - SNAT: enable the option.
- Router type:
-
Add two interfaces to the created router:
- for connecting to the private subnet;
- for connecting to the subnet with internet access.
When creating the interface for connecting to the private subnet, set the following parameters:
- Name:
internal. - Subnet:
priv_subnet_demo. - Specify interface IP address: enable the option.
- Interface IP address:
10.10.2.1.
-
Create a virtual machine with the following parameters:
- VM name:
test-vm. - Network:
priv_net_demo.
Note the internal IP address of the virtual machine. The example will use
10.10.2.213. - VM name:
-
Create the
permit-remote-cidr-insecurity group. -
In the
permit-remote-cidr-insecurity group, add a rule for incoming traffic with the following parameters:- Type:
All protocols and all ports. - In the Remote address block, go to the IP address range tab and specify the CIDR of the private subnet:
192.168.5.0/24.
- Type:
-
Apply the
permit-remote-cidr-insecurity group to thetest-vmVM.
-
Go to Virtual networks → VPN.
-
Click the Add VPN or Add button.
-
Specify the VPN parameters:
-
SDN:
Sprut. -
IKE policy: create an IKE policy with the parameters:
- Policy name:
Demo_IKEv2_Policy. - Key lifetime:
28800. - Authentication algorithm:
sha256. - Encryption algorithm:
aes-256. - IKE version:
v2. - Diffie-Hellman group:
group14.
- Policy name:
-
-
Click the Next step button.
-
Configure the IPsec policy:
- Policy name:
Demo_IPSec_Policy. - Key lifetime:
7200. - Authentication algorithm:
sha256. - Encryption algorithm:
aes-256. - Diffie-Hellman group:
group14.
- Policy name:
-
Configure the endpoint groups:
-
Router:
vRouter01. -
Local Endpoint: create a local endpoint group with the parameters:
- Name:
my_local_demo_endpoint. - Subnet address:
10.10.2.0/24.
- Name:
-
Remote Endpoint: create a remote endpoint group with the parameters:
- Group name:
my_remote_demo_endpoint. - Subnet address:
192.168.5.0/24.
- Group name:
-
-
Click the Next step button.
-
Configure the VPN tunnel:
-
Settings:
Advanced. -
Tunnel name:
demo_tun. -
Peer public IPv4 address (Peer IP):
62.176.10.113. -
Pre-shared key (PSK): generate the key by clicking the corresponding button. Write down the key value for configuring the client network side.
-
Peer router identifier for authentication (Peer ID):
62.176.10.113. -
Traffic flow selector:
Split. -
Initiator state:
bi-directional -
Dead Peer Detection (DPD) settings:
- Action on dead peer detection:
restart. - Dead peer detection interval:
15. - Time to detect a dead peer:
60.
- Action on dead peer detection:
-
-
Click the Create VPN tunnel button.
Configure the MikroTik equipment using WinBox 4 or the CLI.
-
Prepare the IPSec Profile:
WinBoxCLI-
Go to IP → IPsec.
-
Go to the Profile tab.
-
Click the New button.
-
Specify the parameter values:
- Name:
vk-dc-prof. - Hash Algorithms:
sha256. - PRF Algorithms:
auto. - Encryption Algorithms:
aes-256. - DH Group:
modp2048. - Proposal Check:
obey. - Lifetime:
28800. - NAT Traversal: enable the option.
- DPD Interval:
15. - DPD Maximum Failures:
4.
- Name:
-
Click the OK button.
-
-
Prepare the IPSec Proposal:
WinBoxCLI-
Go to IP → IPsec.
-
Go to the Proposal tab.
-
Click the New button.
-
Specify the parameter values:
- Name:
vk-dc-prof. - Hash Algorithms:
sha256. - Encryption Algorithms:
aes-256-cbc. - Lifetime:
7200. - PFS Group:
modp2048.
- Name:
-
Click the OK button.
-
-
Configure the IPsec Peer:
WinBoxCLI-
Go to IP → IPsec.
-
Go to the Peer tab.
-
Click the New button.
-
Specify the parameter values:
- Enabled: enable the option.
- Name:
vk-dc-peer. - Address:
212.233.88.21. - Local address:
62.176.10.113. - Profile:
vk-dc-prof(created earlier). - Exchange mode:
IKE2 - Send INITAL_CONTRACT: enable the option.
-
Click the OK button.
-
-
Configure the IPsec Identity:
WinBoxCLI-
Go to IP → IPsec.
-
Go to the Identities tab.
-
Click the New button.
-
Specify the parameter values:
- Enabled: enable the option.
- Peer:
vk-dc-peer. - Auth. Method:
pre shared key. - Secret: specify the value of the Pre-shared key (PSK) parameter set when configuring the VPN tunnel on the cloud network side.
-
Click the OK button.
-
-
Prepare the IPSec Policy:
WinBoxCLI-
Go to IP → IPsec.
-
Go to the Policy tab.
-
Click the New button.
-
On the General tab, specify the parameter values:
- Enabled: enable the option.
- Peer:
vk-dc-peer. - Src. Address:
192.168.5.0.24. - Dst. Address:
10.10.2.0/24.
-
Go to the Action tab and specify the parameter values:
- Action:
encrypt. - Level:
require. - IPsec Protocol:
esp. - Proposal:
vk-dc-prop.
- Action:
-
Click the OK button.
-
-
Configure the exceptions:
-
Configure the NAT exceptions.
NAT translation exceptions must be placed above the SNAT rule for routing traffic to the internet (rules such as
action = masqueradeandaction = src-nat to address).Run the command:
/ip firewall natadd action=accept chain=srcnat comment=srcnat_fix_for_vk_dc_router dst-address=10.10.2.0/24 src-address=192.168.5.0/24 -
Configure the Firewall allow rule in the Forward chain to allow traffic to pass from the VK Cloud network to the local network through the IPsec VPN tunnel.
The allow rule must be placed above the rule that blocks unknown traffic arriving at the interface.
Run the command:
/ip firewall filteradd action=accept chain=forward src-address=10.10.2.0/24 dst-address=192.168.5.0/24 ipsec-policy=in,ipsec in-interface=ether1Here
ether1is the name of the MikroTik physical interface (port) connected to the internet. -
Configure the Mangle rules for MSS Window optimization:
/ip firewall mangleadd action=change-mss chain=forward dst-address=192.168.5.0/24 new-mss=1360 protocol=tcp src-address=10.10.2.0/24 tcp-flags=syn tcp-mss=!0-1360add action=change-mss chain=forward dst-address=10.10.2.0/24 new-mss=1360 protocol=tcp src-address=192.168.5.0/24 tcp-flags=syn tcp-mss=!0-1360
-
-
Check the status on the cloud network side:
-
List the VPN services in the project:
openstack vpn service list -
Display detailed information about the service:
openstack vpn service show 7a60f4c3-5684-43d8-b5d7-a0**********The
Activestatus means that the service is active and traffic can be transmitted between the remote sites.
-
-
Check the status on the client network side:
WinBoxCLI- Go to IP → IPsec.
- Go to the Policy tab.
- Check the status of the configured policy: the PH2 State column should display
established.
-
Check connectivity between the
192.168.5.0/24and10.10.2.0/24subnets using ICMP Ping:-
Open a terminal session on the VM or server in the client network with the address
192.168.5.9. -
Ping the internal IP address of the machine in the cloud network
10.10.2.213.ping 10.10.2.213 -c 3The IP address should respond to the ping.
-
If you no longer need the created resources, delete them: