
Connecting to VK Cloud via two Cloud Direct Connect channels
Cloud Direct Connect allows you to connect the networks of your on-premises infrastructure to the virtual networks of VK Cloud. The following will show how to create a connection using:
- two dedicated Cloud Direct Connect communication channels;
- an advanced router with dynamic routing via the BGP protocol;
- an additional standard router.
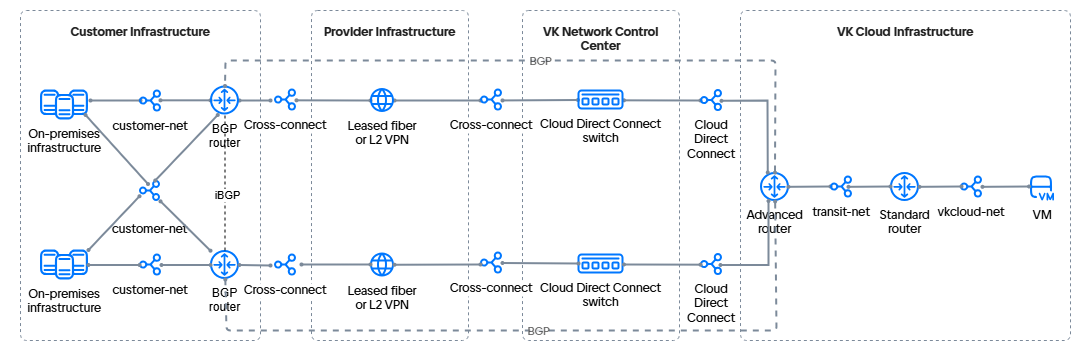
Two dedicated Cloud Direct Connect communication channels are laid with independent cables to two independent data centers of VK Cloud and form a fault-tolerant configuration.
The advanced router in this example is responsible for integration and provides communication with the remote infrastructure. The network hosting virtual machines is served by a standard router of VK Cloud.
The connection option under consideration involves the use of four virtual networks:
- two independent network interconnect networks (Cloud Direct Connect);
- a network for connecting the standard router to the advanced router (transit network);
- a network for hosting virtual machines.
The network connectivity scheme looks as follows:
-
Activate API access if this has not been done yet.
-
Make sure that the OpenStack client is installed, and pass authentication in the project.
-
Make sure that the curl and jq packages are installed on your computer.
-
Select or create a network in your on-premises infrastructure. The network may not have internet access, but it must be connected to two routers that:
- support connection via the BGP protocol;
- (optionally) support the BFD protocol: this will reduce the routing recovery time in case of a failure;
- can be a device or a virtual machine in the customer network;
- communicate with each other using the iBGP protocol.
Write down the following information:
- the name and IP address of the subnet;
- the name of the network where the subnet is located;
- the IP address of a machine in the subnet that will be used to verify connectivity between networks;
- the names of the BGP routers.
For example, a network with two Router OS 7.10 (MikroTik) virtual machines acting as BGP routers will be used.
-
Select or create a virtual network in your project in VK Cloud. The network must not be connected to a router.
Write down the following information:
- the name and IP address of the subnet;
- the name of the network where the subnet is located.
-
Create a virtual machine in the selected network. Write down the IP address of the created VM.
-
Create a transit virtual network in your project in VK Cloud. The network must not be connected to a router.
-
Obtain the UUID of the transit network. In this example:
323d97cf-aaaa-bbbb-cccc-deaa6a11ab25. -
Connect to the Cloud Direct Connect service if this has not been done yet.
-
Obtain the UUIDs of the connected Cloud Direct Connect network interconnect networks:
- In your management console, go to Virtual networks → Networks.
- In the list of networks, find two interconnect networks with names like
external-vni-10XXX. HereXXXis the individual sequence number of your connection. - Save the UUIDs of these networks. In this example, the UUIDs of the interconnect networks are:
- the first interconnect network
external-vni-10XX1:b2b8468e-aaaa-bbbb-cccc-327c8c2670d4; - the second interconnect network
external-vni-10XX2:a2b8967e-aaaa-bbbb-cccc-327f9a2670e5.
- the first interconnect network
-
Make sure that all information necessary for further work has been collected. The following data is used as an example below:
Object
Customer network
Virtual network
Transit network
Cloud Direct Connect network
Network
customer-netvkcloud-nettransit-net,323d97cf-aaaa-bbbb-cccc-deaa6a11ab25external-vni-10XX1,b2b8468e-aaaa-bbbb-cccc-327c8c2670d4external-vni-10XX2,a2b8967e-aaaa-bbbb-cccc-327f9a2670e5Subnet
customer-subnet,10.0.0.0/24vkcloud-subnet,172.17.0.0/24
Virtual machine
client-vm,10.0.0.5vkcloud-vm,172.17.0.8BGP router
MikroTik
-
To the Cloud Direct Connect interconnect network
external-vni-10XX1, add a subnet with a/30mask. When adding environment variables, specify the parameters:N_CIDR="192.168.0.0/30";N_ID="<INTERCONNECT_NETWORK_1_UUID>".
Write down the name and CIDR of the subnet.
In this example, for the
external-vni-10XX1network:- subnet name:
dc-subnet1; - CIDR:
192.168.0.0/30; - UUID:
b2b8468e-aaaa-bbbb-cccc-327c8c2670d4.
-
To the Cloud Direct Connect interconnect network
external-vni-10XX2, add a subnet with a/30mask. When adding environment variables, specify the parameters:N_CIDR="192.168.1.0/30";N_ID="<INTERCONNECT_NETWORK_2_UUID>".
Write down the name and CIDR of the subnet.
In this example, for the
external-vni-10XX2network:- subnet name:
dc-subnet2; - CIDR:
192.168.1.0/30; - UUID:
a2b8967e-aaaa-bbbb-cccc-327f9a2670e5.
To the transit network, add a subnet with a /30 mask.
When adding environment variables, specify the parameters:
N_CIDR="192.168.2.0/30";N_ID="<TRANSIT_NETWORK_UUID>".
When creating the subnet via the API, pass the parameter "gateway_ip": <GATEWAY_IP_ADDRESS_FOR_THE_STANDARD_ROUTER>.
In a Cloud Direct Connect subnet, this parameter is set to null.
Write down the name and CIDR of the subnet. In this example: transit-subnet, 192.168.2.0/30.
Create a standard router with the following parameters:
- SDN:
Sprut. The field is displayed if both Sprut and Neutron SDNs are connected to the project. - Name: in this example,
Standard router. - Connection to external network: the option is enabled.
Create an advanced router with the following parameters:
- Name: in this example,
Advanced router. - SNAT: the option is disabled.
-
Add an interface of the advanced router directed to the virtual network:
- Name:
transit-net-iface; - Subnet:
transit-subnet; - Interface IP address:
192.168.2.1.
- Name:
-
Add an interface of the advanced router directed to the Cloud Direct Connect network
external-vni-10XX1:- Name:
dc-iface1; - Subnet:
dc-subnet1; - Interface IP address:
192.168.0.1.
- Name:
-
Add an interface of the advanced router directed to the Cloud Direct Connect network
external-vni-10XX1:- Name:
dc-iface2; - Subnet:
dc-subnet2; - Interface IP address:
192.168.1.1.
- Name:
-
Add network interfaces for the first router:
- One directed to the Cloud Direct Connect networks
dc-subnet1. This interface will help establish connectivity between VK Cloud and the customer network. - One directed to the customer network where the BGP router is located. This interface is used to connect to resources within the network. The number of such interfaces depends on the network structure.
In this example:
192.168.0.2— an interface to thedc-subnet1subnet;10.0.0.15— an interface to the customer network towards the virtual machine10.0.0.5.
- One directed to the Cloud Direct Connect networks
-
Configure the interfaces of the first router using DHCP.
-
Configure the system identifier (System ID).
-
Prepare a list of networks for BGP advertisement.
-
(Optional) If the router supports BFD, configure the BFD protocol.
-
Add network interfaces for the second router:
- One directed to the Cloud Direct Connect networks
dc-subnet2. This interface will help establish connectivity between VK Cloud and the customer network. - One directed to the customer network where the BGP router is located. This interface is used to connect to resources within the network. The number of such interfaces depends on the network structure.
In this example:
192.168.1.2— an interface to thedc-subnet2subnet;10.0.0.16— an interface to the customer network towards the virtual machine10.0.0.5.
- One directed to the Cloud Direct Connect networks
-
Configure the interfaces of the second router using DHCP.
-
Configure the system identifier (System ID).
-
Prepare a list of networks for BGP advertisement.
-
(Optional) If the router supports BFD, configure the BFD protocol.
-
In your management console, go to Virtual networks → Networks.
-
Click the name of the transit network
transit-netand go to the Network configuration tab. -
Select the standard router
Standard router. -
Enable the Internet access option.
-
Click the Save changes button.
-
Verify the gateway registration for the subnet:
- In your management console, go to Virtual networks → Networks.
- Click the name of the transit network
transit-net, then the name of the subnettransit-subnet, and go to the Ports tab. - Make sure that the port with the gateway IP address is registered in the subnet and has the Connected status.
To establish communication via the BGP protocol, you need to add dynamic routes and specify BGP neighbors. To configure dynamic routing, use private autonomous system numbers (ASN) from the 64512–65534 range. The ASN numbers on the routers in VK Cloud and on the remote infrastructure side must differ. The example will use the following numbers:
65512for thecustomer-netnetwork;64512for thevkcloud-netnetwork.
To configure dynamic routes on the advanced router via the external-vni-10XX1 interconnect network:
-
In your management console, go to Virtual networks → Routers.
-
Open the added advanced router and go to the Dynamic routing tab.
-
Click the Create BGP router button.
-
Specify the BGP router parameters:
- Name:
to-MikroTik1; - Router ID:
192.168.0.1; - ASN:
64512.
- Name:
-
Click the Create button.
-
Open the added BGP router and go to the BGP neighbors tab.
-
Add a BGP neighbor. Specify the parameters:
- Name:
MikroTik1; - Remote neighbor:
192.168.0.2; - Remote ASN:
65512.
- Name:
-
Click the Create button.
Make sure that the router has established a connection with the neighbor: the marker next to the name is green. If you use BFD, make sure that the BFD marker is also green.
The advanced router will start sending BGP advertisements to its neighbor immediately after successful BGP peering negotiation. Go to the BGP advertisements tab and make sure that the router sends advertisements for all networks to which its interfaces are directed:
172.17.0.0/24;192.168.0.0/30;192.168.2.0/30.
All advertisements must have green markers.
To establish communication via the BGP protocol, you need to add dynamic routes and specify BGP neighbors. To configure dynamic routing, use private autonomous system numbers (ASN) from the 64512–65534 range. The ASN numbers on the routers in VK Cloud and on the remote infrastructure side must differ. The example will use the following numbers:
65512for thecustomer-netnetwork;64512for thevkcloud-netnetwork.
To configure dynamic routes on the advanced router via the external-vni-10XX2 interconnect network:
-
In your management console, go to Virtual networks → Routers.
-
Open the added advanced router and go to the Dynamic routing tab.
-
Click the Create BGP router button.
-
Specify the BGP router parameters:
- Name:
to-MikroTik2; - Router ID:
192.168.1.1; - ASN:
64512.
- Name:
-
Click the Create button.
-
Open the added BGP router and go to the BGP neighbors tab.
-
Add a BGP neighbor. Specify the parameters:
- Name:
MikroTik; - Remote neighbor:
192.168.1.2; - Remote ASN:
65512.
- Name:
-
Click the Create button.
Make sure that the router has established a connection with the neighbor: the marker next to the name is green. If you use BFD, make sure that the BFD marker is also green.
The advanced router will start sending BGP advertisements to its neighbor immediately after successful BGP peering negotiation. Go to the BGP advertisements tab and make sure that the router sends advertisements for all networks to which its interfaces are directed:
172.17.0.0/24;192.168.1.0/30;192.168.2.0/30.
All advertisements must have green markers.
-
Connect to the router in your local network.
-
Specify the parameters for connecting via the BGP protocol through the
external-vni-10XX1network:- Local network ASN:
65512; - Router ID:
192.168.0.2; - External network ASN:
64512; - BGP neighbor ID:
192.168.0.1; - Use BFD.
- Local network ASN:
-
(Optional) Verify that a BFD protocol session has been established.
-
Verify that a session with the BGP neighbor has been established. If the BGP connection is established, the response should contain non-zero
keepalive-timeanduptimevalues. -
View all available BGP routes. The route list should include the
172.17.0.0/24and192.168.0.0/30networks.
-
Connect to the router in your local network.
-
Specify the parameters for connecting via the BGP protocol through the
external-vni-10XX2network:- Local network ASN:
65512; - Router ID:
192.168.1.2; - External network ASN:
64512; - BGP neighbor ID:
192.168.1.1; - Use BFD.
- Local network ASN:
-
(Optional) Verify that a BFD protocol session has been established.
-
Verify that a session with the BGP neighbor has been established. If the BGP connection is established, the response should contain non-zero
keepalive-timeanduptimevalues. -
View all available BGP routes. The route list should include the
172.17.0.0/24and192.168.0.0/30networks.
- In the personal dashboard, go to the Virtual networks → Routers section.
- Click the name of the standard router
Standard routerand go to the Static routes tab. - Click the Add static route button.
- Specify the destination network: the address prefix of the customer network, in this example
10.0.0.0/24. - Specify the next hop (Next HOP): the IP address of the advanced router.
- Click the Add route button.
- In the personal dashboard, go to the Virtual networks → Routers section.
- Click the name of the advanced router
Advanced routerand go to the Static routes tab. - Click the Add static route button.
- Specify the destination network: the address prefix of the VM network, in this example
172.17.0.0/24. - Specify the next hop (Next HOP): the IP address of the standard router.
- Click the Add button.
-
In the personal dashboard, go to the Virtual networks → Routers section.
-
Click the name of the advanced router
Advanced routerand go to the Dynamic routing tab. -
Click the previously created BGP configuration and go to the BGP announcements tab.
-
Click the Add new announcement button.
-
Specify the parameters:
- Announcement type: static.
- Destination network: the address prefix of the VM network, in this example
172.17.0.0/24. - Default gateway: the IP address of the standard router.
-
Click the Add button.
-
Reboot the machines
172.17.0.8and10.0.0.5so that the routes are added to their routing tables.
Send a ping or traceroute from one network to a machine in the connected network. If a response arrives from the other network, the network connectivity has been configured correctly.
For example, ping the machine 10.0.0.5 in the customer network from the machine 172.17.0.8 in the virtual network:
-
Open a terminal session to the VM
vkcloud-vm. -
Ping the internal IP address of the machine in the customer network:
ping 10.0.0.5
The IP address should respond to the ping.
If you no longer need the created resources, delete them: